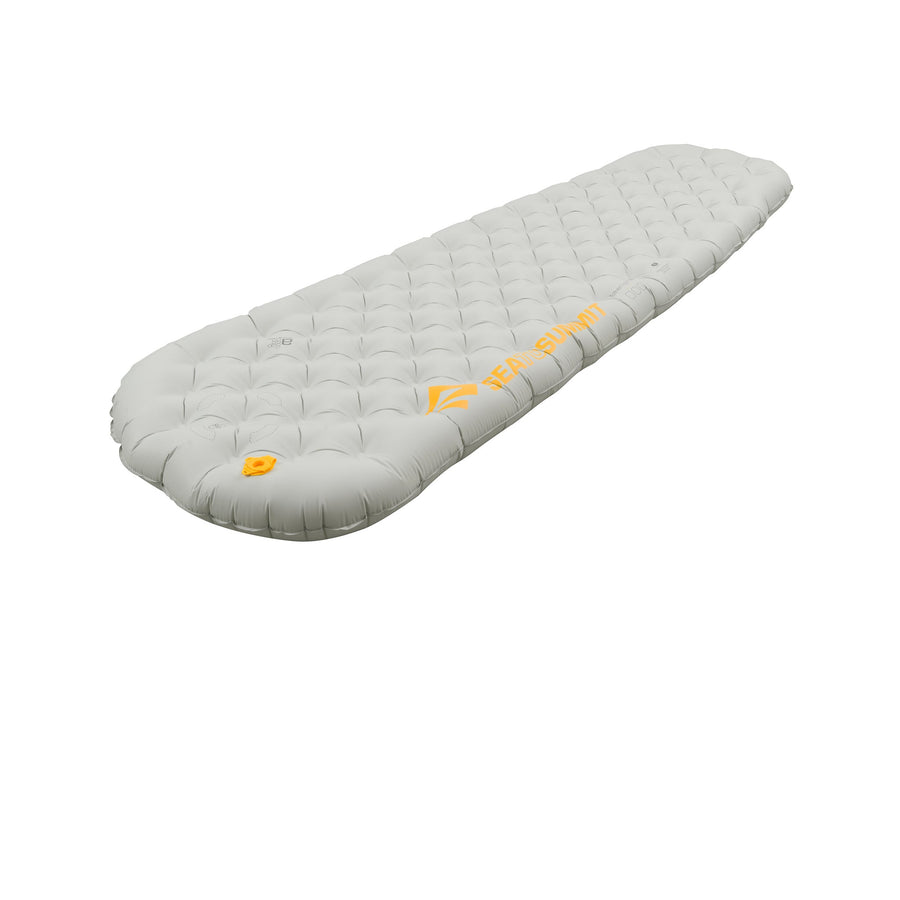
How to Repair Your Sleeping Mat

Don’t let a leaky sleeping mat get you down. Here’s everything you need to know to fix a puncture or tear in your Air Sprung Cell or Self-Inflating mat.
While our mats are manufactured and rigorously tested to be some of the strongest standards out there—a sharp rock or rogue earring can get the best of any camping mat.
Luckily, repairing our mats is easy. Simply follow these steps so you can get back to overnight adventures.
STEP 1—CHECK FOR A LEAK
Not all leaks are obvious—and most people find out they have a puncture when their mat deflates during the night. However, the more obvious sources of damage can be found through close inspection.
- Lay your mat down on a clean, dry surface.
- Look over your mat for obvious major damage.
- Check the valve to make sure it’s undamaged and sealing properly.
- Inflate your mat.
- Listen for air leaks and give a visual inspection of the mat in case you can spot the leak.
If you find the leak, move to STEP 5 to complete repair.
If there is no obvious leak, move on to STEP 2.
STEP 2—TEST FOR A VALVE LEAK
If your mat is losing air, the first thing to check for is a leaky valve. This can be done by dunking your inflated mat under water and checking for bubbles. This might also reveal any punctures along the surface of the mat.
DUNKING METHOD
YOU WILL NEED:
- Bathtub, pool, tub or still body of water—the bigger, the better. A swimming pool is ideal, a sink is difficult, and a bathtub is a good compromise.
- Submerge your inflated mat in water for at least 30 seconds.
- Watch for bubbles escaping from mat and mark area with a permanent marker.
- Pay close attention to the hinge on the valve as an air bubble may take around 15 seconds to form.
If you have a leaky valve, go to STEP 3.
If the air is escaping from another part of the mat, go to STEP 5.
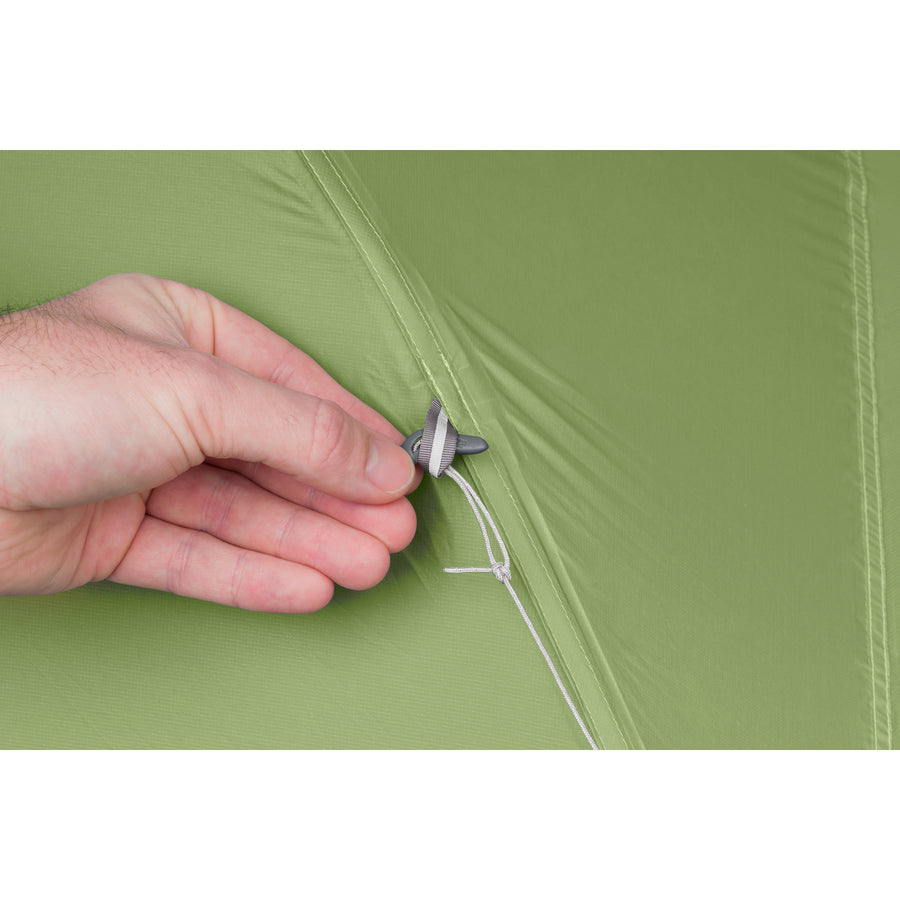
STEP 3—FIXING A LEAKY VALVE
YOU WILL NEED:
- Clean hands or gloves
- Clean micro-fiber toweling with no frayed edges
- Petroleum jelly (such as Vaseline)
Gloves? Vaseline? Don’t be scared. The TPU valve on our S.I. Mats can become deformed or clogged, causing a broken seal. Luckily, this is easily fixed.
PRO TIP: Don’t close the TPU valve when storing your self-inflating mat in its compressed state, as it can become misshapen.
- Use your micro-fiber towel to wipe the valve clean—removing any bits of dirt or sand that are stuck in the valve surface.
- Wipe a film of petroleum jelly on each valve part (the male and female connecting parts).
- Leave for 24 hours, this allows the TPU to absorb a small amount of the petroleum jelly.
- Wipe the valve clean with your micro-fiber toweling.
- Repeat STEP 2.
If there is still air leaking from the valve, jump to STEP 6.
STEP 4—FINDING SMALL LEAKS ON THE SURFACE OF THE MAT
If the mat is deflating but there are no obvious leaks—and you’ve eliminated the valve as the source of the air loss—then the leak must be coming from the surface of the mat. The next step is to identify exactly where the leak is.
SUBMERSION METHOD
YOU WILL NEED:
- Bathtub, pool, tub or still body of water—the bigger, the better. A swimming pool is ideal, a sink is difficult, and a bathtub is a good compromise.
- Slowly submerge your inflated mat underwater section by section, folding it to increase the air pressure of the section underwater. Try submerging 30cm sections at a time. Most leaks are relatively easy to identify because they release a small stream of bubbles.
- If you do find a leak, mark the spot with a permanent marker.
- Even if you find one leak, you should still test the rest of the mattress as there may be multiple points on the fabric that are leaking.
SOAP METHOD
YOU WILL NEED:
- Spray bottle or bowl and sponge filled with a detergent-water mix (choose our Wilderness Wash for an environmentally friendly detergent alternative)
- Towel for drying
- Inflate the mat to a firm pressure.
- Lay mat onto a clean surface.
- Using your spray bottle or sponge, cover the surface of the mattress with a light film of soapy water. You may need to massage this into the fabric to make sure that there is a complete film across the top of the mat.
- Push down on the mattress to increase the internal pressure. Small bubbles will form on the surface of the fabric where there is a leak.
- Use a permanent marker to mark the site of any leak. Make sure that you check the entire surface of the mattress.
- Turn the mattress over and repeat this process on the other side.
- Make sure you completely rinse the surface of the mattress free of soap/detergent before continuing.
Once you’ve identified your leak, continue on to STEP 5.
STEP 5—REPAIRING YOUR MAT
AIR SPRUNG CELL MATS
The repair process for our ASC mats was designed to be very simple and easily performed in the field.
YOU WILL NEED:
Adhesive 3M patches (included with all our ASC mats)- Make sure that you know where the leaks are! The repair procedure is completed with a fully deflated mattress, so if you haven’t carefully marked the spots where air is escaping, you’re going to have to go back and repeat STEP 4.
- Make sure that your mattress is free of any soapy residue and is completely dry.
- Lay your completely deflated mattress out on a clean, smooth surface.
- Make sure the area immediately around the leak is clean and free of any residue.
- Pick the appropriately sized repair patch from those supplied with your mattress. If you need spares, get in touch with us.
- Peel the adhesive backing from the 3M patch and carefully place over the top of the leak. Make sure that the fabric of the mattress underneath is not creased or wrinkled. Try to minimize contact with the adhesive backing of the repair patch.
- Lightly smooth from the center to each edge of the repair patch to remove any air pockets that might have formed.
- Leave for at least five minutes, and then repeat STEP 1 to ensure that the repair has been successful.
- If the mattress is still deflating (which hopefully it isn’t), you will need to go back through the steps to identify further leaks.
SELF-INFLATING MATS
The repair process for our S.I. mats depends upon the model.
- Make sure that you know where the leaks are! The repair procedure is completed with a fully deflated mattress, so if you haven’t carefully marked the spots where air is escaping, you’re going to have to go back and repeat STEP 4.
- Make sure that your mattress is free of any soapy residue and is completely dry.
- Lay your completely deflated mattress out on a clean, smooth surface.
- Make sure the area immediately around the leak is clean and free of any residue, particularly oil. Use an alcohol-based cleaning agent if necessary.
- Cut away any loose threads around the area.
FOR CAMP MAT S.I., ULTRA LIGHT S.I. AND COMFORT LIGHT S.I. (AND THE UNDERSIDE FABRIC OF COMFORT PLUS S.I AND COMFORT DELUXE S.I.)
YOU WILL NEED:
- Silicone Adhesive (included with all our S.I. mats)
- 3M patch (included with all our S.I. mats)
PRO TIP: USE GLOVES TO AVOID GETTING THE SILICONE ADHESIVE ON YOUR SKIN.
- Pick the appropriately sized repair patch from those supplied with your mattress. If you need spares, get in touch with us.
- Apply a light covering of silicone adhesive to the hole or tear.
- Peel the adhesive backing from the 3M patch and carefully place over the top of the silicone adhesive. Make sure that the fabric of the mattress underneath is not creased or wrinkled. Try to minimize contact with the adhesive backing of the repair patch.
- Lightly smooth from the center to each edge of the repair patch to remove any air pockets that might have formed. Apply firm pressure for 30 seconds.
- Allow a minimum of two hours before inflating mattress, and then repeat STEP 1 to ensure that the repair has been successful.
- If the mattress is still deflating (which hopefully it isn’t), you will need to go back through the steps to identify further leaks.
TOP FABRIC: COMFORT PLUS S.I. AND COMFORT DELUXE S.I.
PRO TIP: Use gloves to avoid getting the silicone adhesive on your skin
YOU WILL NEED:
- Silicone Adhesive (included with all our S.I. mats)
- Mesh (included with all our S.I. mats)
- 3M patch (included with all our S.I. mats)
- Plastic square (included with all our S.I. mats)
For holes less than 1/8” wide
- Apply a thick layer of silicone adhesive over the hole, and at least 20mm in diameter.
- Allow at least two hours for the silicone adhesive to dry before repeating STEP 1 to check if the repair has been effective.
Holes from 1/8” to ¾” wide
- Cut a piece of the supplied mesh into a shape that’s a little larger than the hole you’re trying to repair.
- Apply silicon adhesive around the hole or tear. Make sure that this doesn’t extend too far— and use the plastic square to work the silicone into the fibers of the fabric.
- Place the mesh onto the silicone adhesive covering the entire hole or tear.
- Squeeze more silicone onto the top of the mesh and spread with plastic square, making sure that it is completely covered.
- Leave for at least two hours, and then repeat STEP 1 to make sure that the repair has been effective.
- If the mattress is still deflating (which hopefully it isn’t), you will need to go back through the steps to identify further leaks.
STEP 6—WARRANTIES
If you’ve gone through the above steps and your mat is still deflating, please contact us.